Thursday 31 December 2020

Flying Tigers!


The next two coaches are going well. They are more complicated than the first coach since they are brake composites. This means that they have more internal partitions and also a guard's doors on each side. I'm adding more detail and this includes a door handle, 3 hinges and a grab rail. The holes were drilled first, 0.35 mm for the grab rail and door handle and 0.4 mm for the hinges. The grab rail is made up from 0.31 mm diameter nickel silver and the door handles came from Roxey Mouldings. The hinges are the same door handles thinned down a little and pushed home all the way. They are very tiny and hard work to file.

The V hanger was also from Roxey Mouldings and then the step was fabricated from 0.5mm brass wire and some etch sprue from the box. In theory tinning of components and careful placement should make it easy but reality says there are two or three attempts before getting it right.

By now you may be wondering why Flying Tigers. I was struggling to hold the carriage and I didn't want to put it on a flat surface  as that might squash the fittings on the bottom facing side. I hit on using these two wooden pallets to support the carriage. They are probably 1/12 scale and came from Flying Tiger, one of those shops that has all sorts of bits you never knew you needed. Hopefully it is clear from the picture how I am using them. I'm not sure if the pallets are still available as I have had mine for a while.

The real advantage is that they are hollow at the side so the application of a clamp and a piece of wood and the carriage is clamped to the pallet and held robustly without damaging any fittings. Hopefully this picture from the opposite direction shows how they have been utilized. Unfortunately the picture also shows where the paneling is marked but hopefully that will not be so obvious once painted.




Sunday 27 December 2020

Painted Coaches


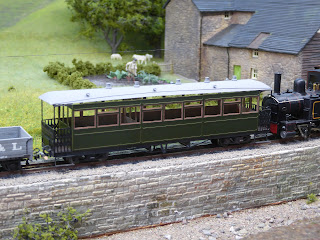
A little bit of progress just before Christmas. The coach has had it's first outing to the paint shop. The panels are sprayed with Bronze Green from a custom paint supplier, the chassis is the same grey I used on Triumph, the balconies were done with coal black, the window surrounds were done with rust and the interior was a mix of antique bronze and ochre.

There are no colour photos from the period so there is a certain level of guesswork along with doing what looks right. The rust could be a little more brown but overall I am happy with the look.

The roof is still in grey primer. I'll aim to darken it a little but colours of roofs after several years service were always indeterminate. What I am not happy with is the bend in the roof which the photograph has cruelly exposed. I've bent it back into shape a little but I am thinking it will be replaced. This roof was made from 5 thou brass sheet and I am wondering if the issue will be less pronounced if I use 10 thou sheet.

The other 2 coaches are on the bench so I suspect I'll do a batch of 3 roofs and see how they come out.


Sunday 6 December 2020

Progress on the Welshpool Coaches


The Welshpool coaches have been on on the back burner for too long. It was time to make progress. The first action today was to complete the roof. I had previously cut the roof with a V at each end and had them rolled to the required radius. I had also cut out some inserts to go in the V. The trick was to hold the roof upside down against some double sided sellotape with the insert roughly placed and then tack a bit of solder to give a little strength and then tack a bit in the other corner. Working like this you can push the ends of the insert around quite a bit until happy with the rough position. After that I bend a bit of waste fret into the inside and soldered that in to provide a base for the join. Adding solder from above then fills the inevitable gap and it is out with the files to smooth it down and make the end shape. The rain strip is then soldered on from 0.31mm brass wire. It gets a little dicey towards the ends as you are in danger of undoing the work already done on the joins.

The fittings on the roof are my own 3D prints and they are superglued in place. The roof was cleaned under the tap with soapy water and then took a turn in the ultrasonic cleaner to remove any final residue.

The next task was to add the truss rods underneath. The undersides of wagons and coaches are always hard to see but I decided the posts for the truss rods were really transverse girders. They should be attached to the underside of the solebars but mine go onto the underside of the floor to provide more strength. After that it was simply a case of adding some 0.5mm wire for the truss rods themselves. A clean and a session in the ultrasonic cleaner and now everything is in the airing cupboard drying out and warming up ahead of priming.

New Year Update

It's been a busy few weeks on the railway front. First it was the SWOONs open day on the Saturday where I had my sales stand for STModel...