Showing posts with label Coaches. Show all posts

Sunday, 16 October 2022

Coaches 2, 3 and 4

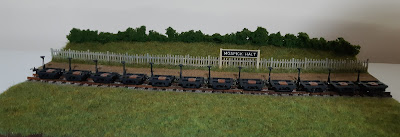
Why the strange title? Very simply, back in April this year I posted that I had completed the first of 4 Ashover coaches. Now I can say that I have almost finished the rest.


The main tasks done since the last update is the lining has been finished on them all. After I took forever to line one side of a coach, my good firend Matt Kean offered to line the rest and finished them off over several evenings - something that would have taken me a few weeks.

I also had to make the rest of the roofs. These are 10 thou brass, 0.35mm brass wire soldered on for rain strips and my own 3D designed and printed torpedo vents glued on. The roofs are simply sprayed with Halfords grey primer and then liberally coated in Humbrol dark grey wash which is then dabbed off with kitchen paper.

Lastly, I glazed all the coaches. This was a tedious job. I found some old Wills packets that had suitable clear plastic that wasn't scratched or cloudy. This was cut into strips (and it is tough to cut) and then stuck in with Kristal Klear. I like using Kristal Klear because it isn't runny and if it gets onto the visible part of the glazing (and it always does), it can be teased away with a cocktail stick as it dries into a rubbery consistency. The first coach took well over the hour but by the time I was onto the last one I had it down to 40 minutes. There is a lot to be said for doing tasks in bulk.


Here's a close-up of coach number 2. The roof isn't stuck down as I need to add some people. There is one last job to do which is to fettle the bogies. When I test ran the coaches round Melin Dolrhyd I discovered that they didn't get round the 12" curves without derailing. Unfortunately I had not been sufficiently careful when assembling the bracke stanchion with the result that they angle inwards limiting the amount of swing on the bogies.

The goal is to get these really finished this week ahead of starting a major update to Melin Dolryhd. More on that when the post man delivers the necessary bits!

Wednesday, 6 April 2022

Coach No 1

Nailsea has been and gone. It was a good show and the layout and stock mostly behaved itself. I did have to return a borrowed engine in a completley dead state but it turned out to be a broken wire. Not something I could fix at the show when I was operating all day. It was great to see friends and to see some quality layouts and be inspired to get on with my own modelling.

I've been lining my first Ashover coach since forever. It's just tedious and the transfers were not always sticking. I had to take advice from Matt who is the master at lining and eventually I developed a technique that worked sufficiently well. It's still tedious and there are 41 individual transfers on each side since I split the long lines into 3 parts.


The lining itself is Fox transfers FG1292 Off white/Straw and I expect one sheet to be enough for all 4 coaches. The lettering and Carriage numbering I commisionned from Custom Model Decals and they have gone on really well. Finally today I put on a coat of Army Painter Satin Varnish to seal the transfers on. I wasn't going to do that today since the weather was foul and I spray in the garden but there was a good break with some sunshine so it got done.

I also finished off the roof. I previously sprayed it with primer before I had put on the rain strip on each side so I stripped it back with and soldered on some 0.3mm dia brass wire. A quick spray with Halfords primer and then a liberal coatning of Humbrol Dark Grey Wash which is then dabbed away with a tissue to leave a mottled appearance.

One confession. I've only done one side! That's good enough but won't do for the planned layout since the Ashover Railway had triangles at each end so both sides will be seen at different times.

Tuesday, 28 December 2021

War Department (WD) Bogies

 Tryng to make this a quickie I have taken a leaf out of Matt's book and have been trying to build in bulk. To that end I have spent some time each day working on the bogies for the coaches and for the two wagons that fell into my shopping cart at the same time.

The bogies are very straightforward. First there is the matter of cleaning off the flash, of which there is a reasonable amount. Once done it was a case of adding the brake blocks, slightly tedious to have to glue 24 of the same thing but you get into a rhythm.

The next phase is to organise couplings. I use Greenwich couplings and these can be easily fitted by cutting and filing a groove in the top of the bogie (one has a very fetching matching groove in the underside. Don't ask!). Once done, I file off the paint from the underside tail of the coupling and then superglue them in. I usually do build Greenwich coupling in bulk and discovered that I did not have a sufficient supply for this project so there was a temporary diversion when I spent spare time on Christmas Day folding and building the couplings. Now that is definitely an item best built in bulk! 

Lastly, the brake assembly needs putting together. Here I fought the tempation to 'improve' it and lost. The pillar is fine and was glued on as is but the shaft on the brake wheel is just too long and the plastic shaft too fragile. I replaced the shaft with some brass wire. I also drilled out the handwheel to take the wire. They were superglued together and, once dry, I cut away some of the brake wheel shaft. This assembly was then glued to the pillar. It's definitely better to have less of a blob under the wheel but some of them are not as level as they should be.

After that it was a case of painting. I elected to hand paint so I didn't get paint in the axle boxes nor the rubbing plate but that meant tediously painting them first with primer (Humbrol Number 1). This struggled in a couple of palces to stick and I realised I had not washed the parts to remove any moulding remover but it wasn't too bad so I persevered. The topcoat was with a Games Workshop "Base Corvus Black". This is a good contenter for a colour that isn't too black but neither is it obviously grey. Again, this was tedious to put on.  

Here they are, a collection of bogies sat on the diorama, just!


Sunday, 5 December 2021

Ashover Temptation

 I recently helped out at the Great British Model Railway Show, operating The Clydach Railway by Richard Holder. Next to the layout was another exquisite layout by David Wright based around the Ashover Railway. I did a bit of research and decided that this could really form the basis of a quickie layout for the simple reason that the stock is all available as plastic kits and the engines are mostly available as ready to run from Bachmann.

More research and more spending has resulted in the necessary books, engine and kits arriving over a period of a few weeks - "another parcel for you" was a repeated refrain in our house!

I've made a start on the Meridian coaches. The kits have been around for a few years and are very popular. Studying them closely I realised I didn't like how the chassis was formed and so, despite the desire for it to be a quickie, I took the opportunity to extend my 3D printing learning by producing my own chassis.


In the picture you can see two Meridian Ashover coaches. The left one is from many years ago and sits on N gauge bogies. The right coach is the Meridian kit with my own chassis sat on the WD bogies that are provided. The locomotive is "Bridget", the excellent Baldwin from Bachmann.

Hopefully, that will get me back on track to it being a quickie!


Sunday, 28 March 2021

Welshpool Coaches Finished

2 years later and the Welshpool coaches are finally finished. It's been a journey of discovering new skills since I had never built a brass coach before, never made my own 3D printed parts, never commissioned decals and so the list goes on.

I'm really pleased with the results. There are aspects I will do differently next time but for now I am happy to consider them done and to move onto another model, again with plenty of aspects of "I've never done that before".

To all those who have offered encouragement, thank you. To Matt and Simon who continue to provide support and ideas, thank you and we'll be down down the pub soon - my round!

I made up a quick video today because I could. This is done with the basic Windows 10 Video Editor and works well except for the lack of transitions but, again, not bad for a first attempt.


Saturday, 20 March 2021

Almost there

When I started the Welshpool coaches I had a reasonable idea of what I wanted to do and knew I would have help in those areas where I had next to no experience. Transfers were always going to be a challenge. My good friend, Matt Kean, has already built some of these coaches and knows exactly how to letter them but it does involve taking individual letters from different transfer sheets and then getting them all lined up. I admire his tenacity on this approach but getting to know Andrew from Custom Model Decals gave me hope that there would be an easier way. Andrew is a fellow member of the 009 Society and is also their webmaster. As I am taking over the position of editor for the 009 News magazine we have plenty to discuss. The process of getting transfers done was surprisingly easy. I had to say what I want and Andrew drew them up. I had to learn how to clearly specify what I wanted but after only 3 iterations Andrew was able to produce some excellent transfers and the standard A6 sheet contains more than enough for 12 coaches.

The pictures below hopefully capture the crispness of the transfers and they were extremely easy to apply. 


Glazing has since been applied to the coaches using acetate sheets stuck in with Kristal Klear. I like using this product to glue in glazing as it can be cleaned up very easily with a cocktail stick and acetates are very resilient to scratching which allows a relatively easy clear up process for any excess glue.

The last stage is seating and people and then I will declare the coaches finished!


Saturday, 13 March 2021

Roofs Part 2

The last post showed the roofs with the right shape, soldered up and with the holes for the fixings all drilled. The next stage is to fit the rain strip. I used 0.4mm dia brass wire but I wish I had used 0.3mm. I'd done a test run before so I knew better than to try and solder along the whole length. This time I tacked it in the middle and then curved it down with the occasional tacks - no more than 5 to 7 along the length. Once all the tacks were there I could pick a tack and heat it up more to get a better fit since I knew there would be two tacks either side to hold it roughly in place. Repeat on the other side and then repeat for another two roofs and the job was done.

The fittings consisted of 5 oil lamps on each roof, 6 or 8 torpedo vents (posher people got more ventilation) and two stove chimneys on the composites. One of the stove chimneys is over the guard's compartment. The other is in the middle of the seating area so it's not clear what it was used for.

All the fittings I designed for myself based on rough drawings and picture and printed on my Anycubic Photon S printer. 

Painting opened up a new area of debate. From the few photos published, it is clear they were painted white originally but I'm modelling several years in so they would have been sooty grey. Nearly all the photos of the coaches are low down so you can't get a sense of the colour of the fittings. Eventually one high up shot showed the torpedo vents much darker than the roof. There are no photographs with the oil lamps in place so I have assumed they were painted the same colour as the roof and would have weathered equally badly.

Having decided that white was definitely not sensible I eventually sprayed them with primer and then put on a Humbrol Dark Grey wash which was dabbed with a kitchen towel to give a more mottled appearance. The vents were the painted with a mix of Humbrol Gunmetal and Coal Black. The mix means it is neither black nor grey but since one is a metallic and the other a satin, it gives a sheen that contrasts with the roof itself. A quick spray with Halfords Matt Lacquer this morning and the end results are below and are ready to be attached to the bodies.


Finally a taster of what is to come - the roofs resting on the bodies of the coaches. The coaches have received their transfers but still need glazing and seating. I'll save that for next week.


Saturday, 6 March 2021

Roofs Part 1

I did promise a post on roofs. I'm out of sync but here it is. The roofs for the Welshpool coaches are interesting for their end shape where they curve down to an almost horizontal line. Andy Cundick, a talented, and prolific, modeller from the Wilts 009 Group, has built several of these coaches and his approach is to use some sheet metal, around 5 thou thick, snip diagonal cut outs from the end, fold it into shape and solder it up, filling the gaps with solder. It works well for Andy but I was not happy about being able to get a decent shape to the roof end.

My technique evolved over a couple of attempts. Initially I cut a piece of 5 thou brass and had it rolled by Simon since I didn't own any rolling bars. This was then taped to a piece of clean waste pipe with wide masking tape. The radius of the roof is around 26mm and the pipe is 40mm diameter which is close enough. Once it is held down securely I marked out all the holes for fittings as well as some triangular cut outs at each end. the distance in from the end is determined by the length of the balcony on the coach.


Once it is all marked out the ends are cut out with a razor saw and holes for the fittings are drilled with the bench drill. After this a similar trick approach was taken to create the inserts to go into the ends. These are a different shape to the ones cut out but again a piece of brass was taped to the pipe and marked out with a longer centre line to better fit the curve.

The inserts had to be fettled to shape and ended up needing some brass scrap to support the joint but proved the technique. What became obvious quickly was that 5 thou is too thin. It flexes just too much to hold its shape. Also with time and activity the roof uncurled and would have benefitted from being rerolled. 

In order to do a better job I decided to redo them using 10 thou brass. I also bought my own rollers so I could roll and adjust the curvature to suit whenever I needed to. The same technique was used and roofs were rolled, taped to the pipe, marked out and cut.

With 3 roofs to do and 3 more kits in the stash I wanted the soldering of the ends to be more predictable. The answer was to make a jig. Recycling a piece of Severn Models hardboard and some coffee stirrers from Caffe Nero I glued down the stirrers to hold the shape of the roof and also provided some supports for the end pieces.


It's simple and effective because it allowed me to produce these.


In the follow up post I'll cover the fittings and painting.

Friday, 19 February 2021

The longest project ever

 Looking back through my blog stream I see that I first posted about the Welshpool coaches in December 2019 and even then they had been on the bench for a while. At last I can report that there has been significant progress. It's still glacial progress but it is definitely progress.


All three have the main bodywork done. Readers with very long memories may recall these are Worsley Works scratch aid kits. They were built with the sides soldered to the floor and a variety of detailing parts added

  • wire and brass strip form the truss rods and queen posts
  • V hanger and my own 3D printed vacuum cylinder
  • finer rods and a frame around the top of the balconies
  • vacuum hoses from Alan Gibson
  • long Greenwich couplings from Tramfabriek
  • door handles and hinges from Roxey Mouldings
  • bogies from Liliput

Allen, at Worsley Works, has also produced internal partitions which are a great addition. The coaches have been sprayed with a bronze green and then a mixture of Humbrol paints have been used for the detailing.

The next stage is transfers and it was looking like having to cut out individual letters from different transfers in different scales but a chance encounter with Andrew Jeffcock of Custom Model Decals convinced me to get him to design a complete set for me and those are now on order and expected soon.

I'm now working on the roofs. More on those in the next post.

Thursday, 31 December 2020

Flying Tigers!


The next two coaches are going well. They are more complicated than the first coach since they are brake composites. This means that they have more internal partitions and also a guard's doors on each side. I'm adding more detail and this includes a door handle, 3 hinges and a grab rail. The holes were drilled first, 0.35 mm for the grab rail and door handle and 0.4 mm for the hinges. The grab rail is made up from 0.31 mm diameter nickel silver and the door handles came from Roxey Mouldings. The hinges are the same door handles thinned down a little and pushed home all the way. They are very tiny and hard work to file.

The V hanger was also from Roxey Mouldings and then the step was fabricated from 0.5mm brass wire and some etch sprue from the box. In theory tinning of components and careful placement should make it easy but reality says there are two or three attempts before getting it right.

By now you may be wondering why Flying Tigers. I was struggling to hold the carriage and I didn't want to put it on a flat surface  as that might squash the fittings on the bottom facing side. I hit on using these two wooden pallets to support the carriage. They are probably 1/12 scale and came from Flying Tiger, one of those shops that has all sorts of bits you never knew you needed. Hopefully it is clear from the picture how I am using them. I'm not sure if the pallets are still available as I have had mine for a while.

The real advantage is that they are hollow at the side so the application of a clamp and a piece of wood and the carriage is clamped to the pallet and held robustly without damaging any fittings. Hopefully this picture from the opposite direction shows how they have been utilized. Unfortunately the picture also shows where the paneling is marked but hopefully that will not be so obvious once painted.


Sunday, 27 December 2020

Painted Coaches


A little bit of progress just before Christmas. The coach has had it's first outing to the paint shop. The panels are sprayed with Bronze Green from a custom paint supplier, the chassis is the same grey I used on Triumph, the balconies were done with coal black, the window surrounds were done with rust and the interior was a mix of antique bronze and ochre.

There are no colour photos from the period so there is a certain level of guesswork along with doing what looks right. The rust could be a little more brown but overall I am happy with the look.

The roof is still in grey primer. I'll aim to darken it a little but colours of roofs after several years service were always indeterminate. What I am not happy with is the bend in the roof which the photograph has cruelly exposed. I've bent it back into shape a little but I am thinking it will be replaced. This roof was made from 5 thou brass sheet and I am wondering if the issue will be less pronounced if I use 10 thou sheet.

The other 2 coaches are on the bench so I suspect I'll do a batch of 3 roofs and see how they come out.


Sunday, 6 December 2020

Progress on the Welshpool Coaches


The Welshpool coaches have been on on the back burner for too long. It was time to make progress. The first action today was to complete the roof. I had previously cut the roof with a V at each end and had them rolled to the required radius. I had also cut out some inserts to go in the V. The trick was to hold the roof upside down against some double sided sellotape with the insert roughly placed and then tack a bit of solder to give a little strength and then tack a bit in the other corner. Working like this you can push the ends of the insert around quite a bit until happy with the rough position. After that I bend a bit of waste fret into the inside and soldered that in to provide a base for the join. Adding solder from above then fills the inevitable gap and it is out with the files to smooth it down and make the end shape. The rain strip is then soldered on from 0.31mm brass wire. It gets a little dicey towards the ends as you are in danger of undoing the work already done on the joins.

The fittings on the roof are my own 3D prints and they are superglued in place. The roof was cleaned under the tap with soapy water and then took a turn in the ultrasonic cleaner to remove any final residue.

The next task was to add the truss rods underneath. The undersides of wagons and coaches are always hard to see but I decided the posts for the truss rods were really transverse girders. They should be attached to the underside of the solebars but mine go onto the underside of the floor to provide more strength. After that it was simply a case of adding some 0.5mm wire for the truss rods themselves. A clean and a session in the ultrasonic cleaner and now everything is in the airing cupboard drying out and warming up ahead of priming.

Sunday, 20 September 2020

Welshpool Coaches & 3D Prints

 Another huge break between posts. How does that happen? The last 3 months have been largely devoted to 3D printing. After the success with the side windows on Triumph I knew I had to get back to the Welshpool & Llanfair Pickering coaches. The big outstanding task was the roof. How to do it? How to roll it and then the fittings. What were the best fittings, the torpedo vents and the oil lamps. After a couple of purchases that really weren't what I was looking for, I decided I must surely be able to design and print suitable ones.

I've been following Vladimir Mariano on YouTube and he has some excellent courses that have been advancing my skills at 3D design. I had to learn a few more commands but eventually I came up with the following design. There are no drawings for these so they are an interpretation of all the photographs I could lay my hand on.

Having the design is one thing, working through the practicalities of printing took more effort. Essentially the printer prints upside down so you have to think about supporting edges that are in free air. There are also issues around where resin can collect and build up in unexpected places. The final design looked like this - you chop off all the unnecessary bits after printing.

There are nearly always supports required with 3D prints and if you let the printer software add them then they conspire against you and make these size prints take 3 times the time they should. I have developed my own technique for adding supports within the CAD program which is working so far for me. I also replicate items to create strips of 12 items, 5mm apart which nicely fits the printer build plate

Bearing in mind the body of these lamps is only a few mm high they are a tad challenging to photograph but here is the best I could achieve with my camera


The torpedo vent was done in much the same way. There are some drawings but their accuracy is not assured and the photographs are challenging simply because most are taken from ground level and the Pickering coaches had an enormous rain strip which consistently hides useful detail. the WLLR does have some replica coaches but with anything replica there are going to differences with the original and I have no way of knowing what is accurate.

Again, only a few mm high so hard to photograph but the end results do seem to have been worth it.

I have also done the guard's stove chimney for the composite coach along with a brake cylinder to go under the coaches. Who knows, the coaches may make an appearance soon!

Saturday, 4 January 2020

And Then There Were Two

Not yet at the full complement but with some perseverence the second coach is now in the same state as the first. The confidence of having worked out all the issues on the first coach showed with how quickly this one went together.


I'm using Lilliput bogies under these coaches but the couplings on the bogies were fouling the underframe and everything else is Greenwich so I ordered some Centre Point Couplings from Sven at Tramfabriek and they were really quick to put together and they just work.

I have the third coach to build but I am short of bogies for those. I have some Banwy ones to try but I'm not sure I want to mix and match now that the Lilliput ones have proved effective. Can I sneak some more modelling time tomorrow to get the full set - I might even play the album to celebrate!

Monday, 30 December 2019

Letting the passengers sit down

I've had a WLLR coach partially built for a while. It's one of Worsley Works scratch aids. It's certainly caused me to do some scratching of my head as I worked out what I needed to do. I've had the basic shell built for a while but have kept putting it off going to th enext stage. There were definietly a mixture of reasons in there from being unclear on the next stage, unclear how the roof was going to be done and also the soldering wasn't going that well.

I decided I needed to fix my soldering first and invested in a new temperature controlled iron. I suspect that all I needed was a new bit in my 25 year old Weller iron but new bits are a similar price to a new iron these days! I also decided to stop using multi-core solder and started using some Carr's solder I had in stock. I've always used Carr's green flux. It made a huge difference or else I was just more confident.


The first job was to take off the false flooring on the verandas as it was making the railings too high. then I was able to fix the railings relatively easily, if you ignore the burnt finger. At least it was only one finger. I still have memories of 40 years ago catching a falling soldering iron by the hot end. That hurt and necessiated a trip to the school nurse - do they still have those?

I also soldered in some brass nuts to hold the fixing screws for the bogies. Now I need to work out what height the coaches should be and whether there is enough space for the steps on the end.

Sunday, 10 January 2010

Coaches finished


Okay, so not a lot of progress since September - lots of the usual reasons. However, I have a show next Sunday -
Mospick Halt is at the Beds and Bucks open day for the 009 Society (details on the society website here).

Over Christmas I managed to do some modelling and as the Kidlington Scoutrail exhibition has been cancelled I have made quite a bit of progress and the coaches are finished. As I said in my previous post, I built them pretty much as instructed. I came across two issues, one expected and one not:

The coaches are very light. They were jumping off in several places on my track. In the end I added as much lead as I could under the underframe. It had a very good effect but still they derailed at a particular point and at a particular curve.

The other problem was the back to back measurements. I've got a back to back gauge and I used it to check the wheels and found two coaches were fine but the one was badly out and this was the one that kept coming off. A quick set of the back to back and hey presto - it still came off over certain points!

Much head scratching and running of the coach over the point convinced me that the coach was riding up on the flange rail. Got the vernier out and there is was. Despite the back to back gauge fitting the wheel set perfectly it still wasn't enough for this point. Made the wheelset wider and I have 3 new coaches that run over all the points!

The only problem is when I pull them with the new loco they still derail on a bend - more on that in another post.

Tuesday, 29 September 2009

Parkside Dundas Coach


I've had these coaches around for a while. They're a nice size and relatively easy to put together. I have built them pretty much as per the original kit. the one modification I made was to the bogie fixings. I literally screwed a bolt into the underside of the coach. It holds well and can be unscrewed for maintenance.

One strange point is that the far bogie has a brake wheel stanchion fited to the bogie itself. Unfortunately it is so close to the body of the coach that the bogie can't turn so well in one direction. It's not a problem for running on Mospick Halt. I just have to make sure which way round I put the coach on the track.

The door handles are not painted. I just used a gold pen that Jill normally uses for writing cards. It comes off after a while but is easily replaced. A coat of varnish would help the colour remain.

I have two more coaches just waiting for some people to go in them before the roof is put on.

Leek & Manifold Transport Wagons

Personal modelling has taken a big hit recently with launching a new shop for STModels along with taking the trade stand to Narrow Gauge Sou...